The Fibonacci tool is powerful on the 5-minute timeframe. Backtesting and practice can improve skills. Patience is key. Examples showed successful trades. Use the preferred broker provided.
Using Fibonacci Reversal on a Five Minute Chart for USD/JPY
Introduction
In this article, we will be discussing the power of using Fibonacci reversal on a five-minute chart. We will be using USD/JPY currency pair as an example and highlighting a few trades using Fibonacci reversal that have panned out over the last couple of days.
Benefits of Back Testing and Practicing
Before we delve into the trades, it is critical to note that the more you back test and practice, the better your brain will be trained to identify such setups in charts. Back testing helps train your brain to identify trade setups, which enables you to become a better trader.
Recommended Broker
Before we proceed to the trades, it is worth mentioning that a link has been provided in the description of the video that links to the broker this trader is recommending. The broker has fantastic spreads, margins and customer support, making them a reliable option.
First Trade Example
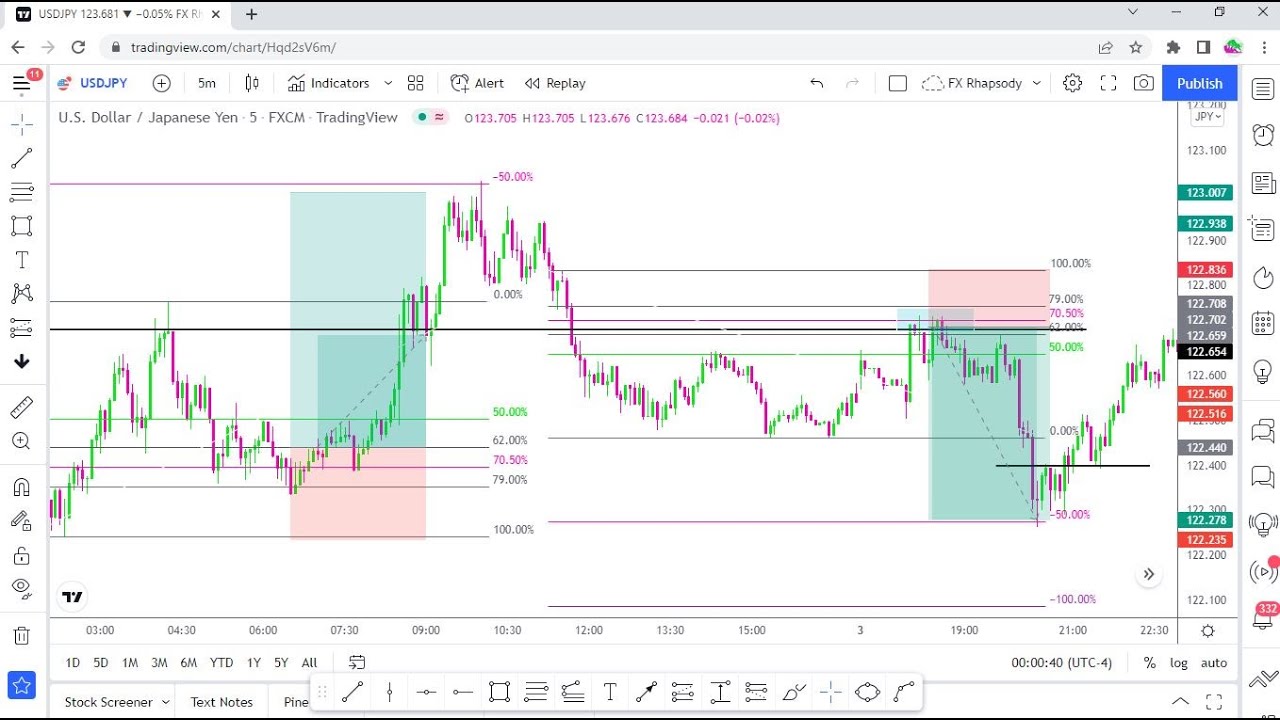
In the first trade example, the trader identifies a swing low and a swing high on the USD/JPY five-minute chart. After the swing high, the candle sparks downwards, indicating a potential setup. The trader draws a Fibonacci retracement from the swing low to the swing high point.
The retracement hits the 62 percent area, which is a key area for more traders. The trader places a buy entry and sets the stop loss just above 10 pips, with a take profit of 26 pips. With this trade, the setup reward amounts to two times the setup risk.
Second Trade Example
In the second trade example, the trader identifies a breakout from a resistance line, indicating an entry point. The trader draws a Fibonacci retracement from the bottom swing low to the swing high, where it broke out.
The retracement hits the 62 percent area, and the trader places a buy entry. The stop loss is set just under 100 pips, with a take profit set at 38 pips, resulting in a risk-reward ratio of 7.2 to 1.
Third Trade Example
In the third trade example, the trader identifies a consolidation area, and after price breaks out of the area, it retests the area. The trader then draws a Fibonacci retracement from the swing low to the swing high, which bounced within the consolidation area.
The entry is to sell, with a stop loss of 9 pips and a take-profit point of 27 pips. The risk-reward ratio is 3 to 1.
Key Takeaways
In conclusion, Fibonacci retracement is an excellent tool for trading as it allows traders to identify key entry and exit points. It is essential to back test and practice this tool repeatedly to improve. Patience is the key to ensuring your trades pan out as expected. In the three trade examples highlighted, the risk to reward ratios ranged from 2 to 1 to 7.2 to 1.
It is worth noting that while these trades panned out well, trading always carries a risk. Therefore, it is wise to ensure that you are always practicing responsible risk management when trading.
